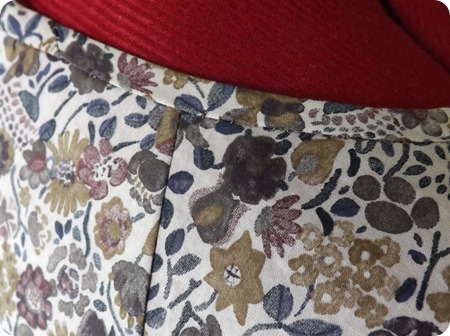
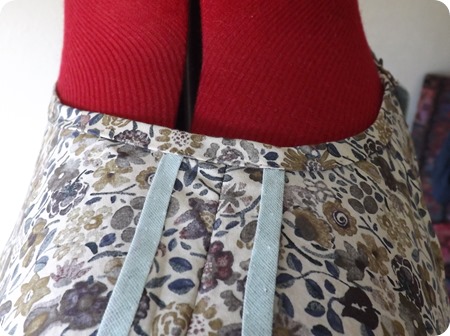
A couple months ago I cleared out my wardrobe for the first time in a decade and it was depressing – so much stuff to give away/take to the charity shop/textiles bank. A lot of these things were items I’d actually made and weren’t too bad, I’d just rushed them or not considered the fit. Seeing them in a pile with my circa 2007 wardrobe, I realised they were basically as good as some average ready to wear things I could pick up for about the same price as the fabric. In hindsight this seemed very wasteful of both fabric and my time. It also dawned on me that, with the exception of some things I’ve made my boyfriend (most recently the Colette patterns Albion jacket), I’ve never actually loved any of the things I’ve made myself, more just thought “that’ll do I guess”.
In the last few months I’ve been happily pottering along making things for other people, but I haven’t really enjoyed sewing in the way I used too. I decided that the best thing to do to get myself enjoying it would be to start again from scratch but to aim for perfection on everything. I invested in two books on couture sewing (Clair Schaeffer’s Couture Sewing Techniques and Vintage Couture Tailoring by Thomas Van Nordheim) and invested in a better iron (pressing is key and what not). I then went from blog to blog looking for a very simple top pattern that I could try out the things I’d read about.
After seeing countless beautiful version of the Anna dress from By Hand London, I bought the pattern. I figured I’d just use the bodice and then shorten the skirt to a top length whilst adding in some volume – basically it’s a peplum top.
You’ll have to take it from me as I was feeling too camera shy to wear it myself but this top fits me like a glove! The mannequin has a far more uniform shape so if you see any gapey/taught bits, I promise they’re not around when I wear it.
The Fit
The original fit was completely wrong for my body shape. First I made the bodice up in calico and my boyfriend cautiously noted how “it doesn’t meet at the back waist…”. He then kindly inserted a little extra fabric where it wasn’t big enough and pinched out all the excess fabric at the back for me to get it to fit. Back to the drawing board.
After going on threads magazines website and watching their tutorial on fitting a torso I figured it was all about the shoulders. Honestly, this clears up so many pattern fitting issues and is so simple. I highly recommend the video on threads but I had to sign up as an “insider” for a couple quid a month which is probably excessive if you just need to know about shoulders. Basically have someone draw round your neck and shoulder line and then transfer to the pattern (this video shows you how to do the latter).
So after adjusting the shoulder slope I looked at all the markings on my first toile. I had to remove one dart from the back and replace it with two (a little one at the top and larger one at the bottom). Second toile completed…it still had too much going on round the front (but looking good round the back!).
I had to take out loads of fabric at the front neckline which I rather awkwardly transferred to the pleats and then made up my third and (fingers crossed at this point) final toile. Success, the fit was now perfect (this is a new concept for me).
The Construction
I then got to do the fun bit and make up the finished pattern in a Liberty Tana Lawn using all the techniques I’d been reading about. Consequently this was not a quick project (which oddly made it far more enjoyable for me) and probably took me 40+ hours – what can I say, I’m slow at hand sewing!
During the construction I barely used a pin (seams basted together prior to any machine sewing) and left the seam allowances full (notches and such were marked with basting thread). Here is my workflow ignoring any basting and pressing (which was constant):
1. Machine stitch in the pleats and the shoulder seams.
2. Hand sew on bias binding to shoulder seam edges. It was at this point I found that my thread was knotting a lot so I bought myself some “thread heaven” which is a conditioner for threads and stops it tangling and knotting up as you work – it really saved me a lot of trouble and cost less than £2 on eBay.
3. Prick stitch the shoulder hem so its hem is invisible.
4. Machine stitch the bodice side seams, cut out the arm pit notches, hand overlock stitch to 2mm (including round the notches).
5. Using a catch stitch bias bind the neck edge using the same liberty fabric and using hand stitching again, bias bind the back edge (in retrospect I actually should have done this latter bit after step 7 ![]() ).
).
6. Join the peplum pieces together using French seams, finish back edge by hand with bias binding and machine stitch the skirt to the bodice.
7. Trim waist seam allowance and press open. Enclose the seam allowance with bias binding again. I really struggled to find other examples of this that weren’t machine stitched on (I didn’t want to be able to see the threads of the other side) so I just used a catch stitch on each side. I used Gutterman “Sulky” thread which is made of nylon and like sewing with hair – the thread knots easily and is total pain but you can’t see the teeny stitches on the outside.
8. Attach invisible zipper using fancy new foot (a special birthday present) for my Bernina and then join seams below invisible zipper. Attach hook and eye closure at top.
9. Hand stitch bias binding to skirt hem, press up and prick stitch using nylon thread (this took a second to write and ~6 hours to do but I love the finished result).
And there we have it, a simple top but probably my best work at this stage of my sewing career. Needless to say the amount of hand sewing means this top is hand wash only but I don’t mind so much after all that work!
Next on my sewing table, Thread theory Jedediah shorts for my boyfriend (currently making him up a trouser block so fingers crossed < 3 toiles this time…).


